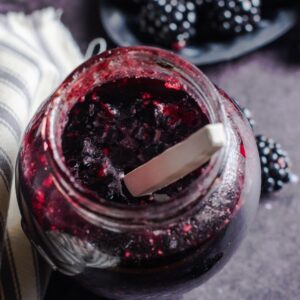
Homemade Blackberry Jelly (Bramble Jelly)
Blackberry jelly, or bramble jelly as it is also known, is a beautifully sweet, dark jelly that can be made with sweet summer berries. Make the jelly in the summer and enjoy all year round!
Print
Pin
Save
Servings: 6 jars
Calories: 581kcal
Equipment
- Large jam pan or stock pot
- Jelly bag
- Stand to drain fruit
- Sterlised jars
- Thermometer
- Jam funnel (optional)
- Wax paper discs (for setting on top of jelly)
Ingredients
To make blackberry juice
- 2.5 kg blackberries
- 1 ltr water
To make blackberry jelly
- 1.2 ltr blackberry juice
- 900 g granulated sugar
Instructions
Set up equipment
- Before you start get your equipment ready and set up. You will need a jam pan or a large stock pot both to cook your blackberries and later to make your jelly.
- To make jelly you will require a jelly bag and a stand to hold the bag to allow you to drain the fruit. Set up your jelly bag and stand over the bowl that you are using to collect the strained liquid. (My Dad made my stand for me however, these are readily available online or from hardware stores).
- Alternatively you can set a fine sieve, lined with a double layer of muslin cloth, over a large bowl and strain the fruit through that!
Sterilise jars
- Sterilise your jars and lids (ensure lid is separate to jar). My preferred method is to put them through a cycle in my dishwasher, unloading them while still hot onto an ovenproof tray. Place them in an oven at 170C/150CFan until needed.
- Place a saucer in the freezer for testing the jelly later.
To make the blackberry juice
- Wash the blackberries and place in a large saucepan and add water, which should come just below the top of the fruit.
- Bring to the boil and then reduce to a simmer and cook the fruit until it is soft , this will take around 20 minutes.
- Take the pan off the heat and gently spoon the mixture into the jelly bag. Do not be tempted to press the fruit down into the bag, nor squeeze the bag, as this will give you a cloudy jelly. Leave the liquid to drain from the bag until it has finished dripping into the bowl below, then discard the fruit. This should take around 4 hours but can be left overnight. [Note: if making a mixed jelly repeat this process with the second fruit.)
Make the blackberry jelly
- Once drained pour the juice into a large, heavy based saucepan or stockpot. For every 600ml (1 pint) of fruit liquid you will need to add 450g (1lb) of granulated sugar to the pan. I use ordinary unrefined granulated sugar as jam sugar tends to be more expensive. [Jam sugar contains added pectin which I have never needed to use. See further note on sugar in the recipe post.]
- Put the pan on the heat and slowly bring to the boil, allow the sugar to melt into the juice. Once at boiling point adjust heat to obtain a good rolling boil. This is really important as a rolling boil is required to get the jelly to the right temperature for setting. Try not to stir the liquid as stirring will only reduce the temperature. As you are heating the liquid skim off an scum that may appear, whilst doing you no harm it doesn't look good once set. You want to achieve a nice clear jelly.
Testing the set of the jelly
- Here comes the difficult bit, knowing when to take the jelly off the heat. There are a number of tests, if using a jam thermometer the setting point for jelly is around 104.5C/220F. Use a jam thermometer to let you know when the jelly is ready.
- When ready to test the jelly take the pan off the heat until you test the set. This will stop the jelly from cooking too much while you test.
- It is then worth doing the wrinkle test. If you placed a plate in the freezer before you started making jelly, take it out when you think the jelly is almost ready. Spoon some jelly onto the cold plate, pop it back in the freezer for a minute or two, then take it back out and push the jelly with my finger to see if it wrinkles. If it does then the jelly is ready.
- If you want a really firm set the wrinkle will stay in place after you have removed your finger. [This is the most difficult part of the process and it is something that becomes easier over time as your begin to know what to look for. That said, I have potted jelly into jars only to return it to the pan the following day for a further boil as it was just too soft a set!]
- If you think the jelly is a little runny and loose, return the pan to the heat and get it back on a rolling boil for another 10 minutes and test again.
- Pot the jelly while it is still hot into the sterilised jars. Take care as the liquid is very hot, use a jam funnel over the top of the jars to get the jelly cleanly into the jars and avoid spillage. Next place a wax disc on top as it prevents the jelly drying out and also stops any mould from forming. Seal with a screw on lid and set aside to cool. Once cool label the jelly and store in a cool, dry place. The jelly should keep for at least year stored like this.
Notes
Blackberry jelly (or Bramble jelly) is really nice when mixed with other flavours, for example apple, peach or raspberry. If making a mixed fruit jelly, for example blackberry and apple, cook and strain the two fruits separately then add them together when ready to make the jelly.
Soft fruit does not need cutting up before adding to the pan, boil it whole before straining through the jelly bag.
Once a jar of jelly has been opened it should be stored in the refrigerator and used within a month.
Sealed and stored in a cool, dry cupboard this jelly will store for 1 year.
If you don't have time to strain the blackberries and then make the jelly, the blackberry juice can be easily stored in the freezer for a later date.
Nutrition Facts
Homemade Blackberry Jelly (Bramble Jelly)
Amount Per Serving
Calories 581
% Daily Value*
Sodium 2mg0%
Carbohydrates 150g50%
Sugar 150g167%
Iron 1mg6%
* Percent Daily Values are based on a 2000 calorie diet.
• Please note that the nutrition information provided above is approximate and meant as a guideline only •
Tried this recipe? We'd love to see your photos!Mention @lostinf00d or tag #lostinfood!
Share on Facebook